It took me a bit to get the Thanksgiving decorations up this year. Finally last weekend, for the Duplo party, I got me rear in gear and got to work.
I wanted something to replace the Halloween pennant banners that I had made. At first I thought that leaves would be the way to go, but then I saw this feather garland, and decided to branch out of the transnational and try something a little new and fun.
And while I love the look of felt, I really wanted something a bit simpler to make. Enter paper and my Silhouette Cameo. (Have I told you how much I love that thing??) I downloaded a feather pattern and proceeded to cut out feathers in three sizes out of paper I had in my paper stash.
Then I simply used my sewing machine to stitch them together. Viola! I added one to our old window that is sitting on our desk along with the Give Thanks printable found here. And I hung the longer one over our hanging picture display.
Of course I redid the chalkboard for Thanksgiving. My sister-in-law had emailed me this idea and I went with it and made it my own. And added a turkey made by Peachy.
I kept my mini pumpkin hurricane from Halloween and flanked it with this printable I popped into a frame and a canvass print.
I have a great fall table runner from my mom that fits perfectly on our skinny table at the top of our stairs. That coupled with a frame I made, a wooden pumpkin basket filled with some gourds, and this printable backed with a Silhouette cutout, finished that table.
Finally in the entryway, I gathered up all of our mini pumpkins and gourds, added some candles, and this printable in a frame.
These new decorations coupled with having a busy week are about all that held off the Christmas decorations this year! What about you, did you decorate for Thanksgiving or have you already started on Christmas?
I am linking up with Dare to DIY.
Go and check out all of the other great ideas!
Monday, November 25, 2013
Tuesday, November 12, 2013
Christmas Craft Show
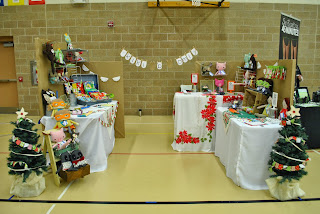
This weekend I got into the upcoming Christmas spirit a bit early by participating in a local Boutique. It was held in connection with a holiday tour of 7 decorated homes in the area.
As usual, I was a crafting whirlwind right up until the night before the show, but all of my work paid off with a great booth and a good show. I had my every growing and changing menagerie of up-cycled friends there, in addition to my art caddies, large and small, and crayon rolls.
As a special to the show, I also offered some Christmas scrappy bunting. It was my biggest booth to date, 10 feet by 10 feet. Mr. Cherry helped me plan my booth floor plan once again. (I am so thankful for a suppirtive and helpful husband!! Especially one who has such better spacial skills than I.) I used my basket and hook set up on my craft paper covered peg board walls.
I also added two small Christmas trees to each side. And of course I had to get out my vintage Christmas linens.
And since it was a two day show, there was some inevitable down time. I had brought along my Christmas cards and almost finished working on addressing them! It feels so good to get ahead a bit.
I would like to use this time as a little reminder to you all of the importance of shopping handmade and small local businesses all throughout the year, but especially at Christmas.
A small order can make someone like my day. Before you go out to Target and the mall to do your shopping, maybe take a look at your downtown and see what gifts you can purchase there.
Or stop by Etsy and browse all of the great handmade items for the people on your giving list. (And if you just so happen to need something for a little person, my shop is kiki b omi designs. I hope to have it filled with soon!!)
Monday, November 11, 2013
Little Man Tie Tee Shirts
Have you ever seen the Blume line of products for kids? So many fun ideas! A friend recently sent me a request to make her adorable little boys some Blume inspired Little Man Tie Shirts since she couldn't find matching shirts in the correct sizes. She wants to use them for their family's Christmas pictures. Isn't that going to be awesome?
I started by purchasing plain red shirts. I found mine at Target. Then I took a man's tie and cut it down to make a tie for each shirt. I wish I could tell you how I ended up making the tie, but it was really by trial and error. After stitching the ties up, I decided to connect them to the shirts with velcro. That way they can be removed for washing.
I can't wait to see your little men in their tie shirts, Jenny!
Friday, November 8, 2013
Foodie Friday: Bacon Cheeseburger Bombs
I made these Bacon Cheeseburger Bombs a few weeks ago and we all enjoyed them. I did make a couple of minor changes to the original recipe from Spend with Pennies. I started by adding some dill pickle relish to the mix, because what is a cheeseburger doing without any pickles, I tell you? I also didn't have any bacon on hand, so I used bacon bits. (I know this is a bit of a travesty, but it is what it is!) I also just used shredded cheese rather than the cheese cubes the recipe suggests in an effort to get them in the oven so that we could eat. These were a yummy meal for our family and one that we will make again. You can get the recipe here.
Tuesday, November 5, 2013
New Purse: Go Anywhere Bag by Noodlehead
I also decided to add a zipper. (It is just a way of life with two kiddos that my bag doesn't always get placed right side up. A zipper closure ensures I am not scrambling all over the Target parking lot trying to find various items from my purse.) I also added a key clip, as I hate digging to the bottom of my bags trying to find my keys. I ended up making the handles with webbing wrapped int he quilt weight fabric. (An idea I grabbed from the Noodlehead Divided Basket pattern.) In addition to the quilt weight fabric I used a chambray and a mid-weight denim that I already had on hand.
I love how the chambray looks with the accent fabrics and the denim lining adds a nice weight to the entire bag. This bag has a great sized interior and the addition of the six pockets on the outside work well for sippies, sunglasses, and other odds and ends. I am loving it.
Friday, November 1, 2013
Foodie Friday: Sweet and Salty Munch
While Halloween is over, you may still have a Halloween event or two to attend. This Sweet and Salty munch would be an awesome last minute addition to bring. And it isn't just for Halloween, sub in some different holiday candy and sprinkles and you have a whole new way to enjoy this treat.
There really is something about the sweet and salty taste in here that makes it so you just can's stop munching it. So watch out. This can be very dangerous to have around!
Head on over to Bloom Design for the recipe.
Subscribe to:
Posts
(
Atom
)


