Friday, January 31, 2014
Foodie Friday: Stuffed Manicotti and Meals for Friends
Do you have a go to dish when you want to bring a meal to a friend? I tend to vary what I bring, but I usually do it in a similar fashion. I have a hard time cooking a meal for someone else and not just cooking one for our family, too. So, I normally just double a recipe to make one to keep and one to share. I also try to include more than just a main course. I figure bringing the side items really can help someone out who needs it. I once read a post where the author would bring EVERYTHING. I don't go as far as bringing milk, but I do try to include a veggie or salad and also some sort of dessert if possible. I also try to bring everything in containers that I don't need returned. I figure it is one less thing for them to have to worry about at a busy or rough time. I also like to make the meal freezable if possible. That way if they have an abundance of food at the time I bring the meal, they can use it at a future date. I also like to include any instructions they may need for reheating and preparation in writing. That way they don't have to remember anything. In addition to directions, I include the recipe. Not so much because I think they are going to want it, hopefully they like it, rather in case they have any allergies or other dietary considerations.
I recently had two families that I wanted to bring a meal to, so I thought I would share the meal and recipe with you for inspiration.
I started with one of our staple recipes, Stuffed Manicotti. I added in one of our new favorite salads, spinach with dried cherries. I also included some homemade buns I had on hand along with some mini muffins I also had.
Stuffed Manicotti
Ingredients:
*8 oz Manicotti
*2 Jars (27 oz) spaghetti sauce
*2 Eggs
*15 oz Ricotta
*4 cups Shredded mozzarella
*1 cup Grated Parmesan
*1 T dried Parsley
*10 oz Frozen chopped spinach (thawed and drained)
Directions:
1) Cook manicotti according to package directions.
2) Preheat oven to 350.
3) In bowl: Beat eggs, stir in ricotta, 3 cups of mozzarella, 3/4 cup Parmesan, parsley, and spinach.
4) Spray 9 by 13 pan.
5) Spread one jar of sauce on bottom.
6) Fill manicotti with ricotta mixture and arrange in pan.
7) Top with second jar of sauce and remaining cheese.
8) Bake covered until bubbling (about 45 minutes.)
9) Uncover and bake five more minutes.
There you have it. Do you have any tips or tricks on sharing a meal? Do you have a go to meal to share?
Thursday, January 30, 2014
I Love You: Valentine String Art
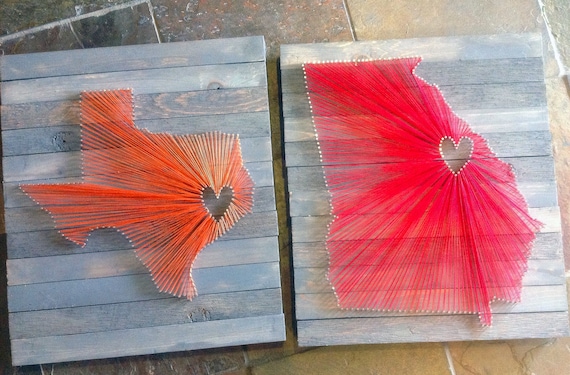
String art is nothing new. And as with many handmade items, it seems to be enjoying a resurgence. Check out these awesome examples I found!
Family Fun Magazine recently featured some fun string art projects for kids. (Here is the link to the online article.) Peachy and I decided it would be a fun project for her to take on, but even better a project she could do with her dad.
They came up with the design together and after dad did the nails (I am sure an older child could handle this on their own,) Peachy started stringing.
It took a little while as she would need breaks here and there. And actually the U was completed months after the project began.
They tried to use supplies that we had on hand, but in the end they bought some nails with bigger heads to keep the string from slipping.
There are lots of great ideas out there for some fun string art projects. And I would say it is fun for all ages.
 |
| From FORtheLOVEco on Etsy |
 |
| From GrizzlyandCo on Etsy |
 |
| From justbaustralia.com.au |
 |
| From Studio Calico |
They came up with the design together and after dad did the nails (I am sure an older child could handle this on their own,) Peachy started stringing.
It took a little while as she would need breaks here and there. And actually the U was completed months after the project began.
They tried to use supplies that we had on hand, but in the end they bought some nails with bigger heads to keep the string from slipping.
There are lots of great ideas out there for some fun string art projects. And I would say it is fun for all ages.
Tuesday, January 28, 2014
Weekend in the Rearview
 |
| This little girl has gotten into projecting like her older sister. I love the tongue out for determination. |
 |
| Of course this is the face she makes when she realizes her picture is being taken. |
 |
| I finally got to make some meals to take to a couple of other families. And of course some for us, too. |
 |
| I love this age where doing something as simple as sorting the recycling makes the girls happy. |
Just being home as a family can be so nice. We "slept in" both mornings and ate all three meals as a family. The girls played and the adults rested, played, and got a few things done.
 |
| They actually got sad the last time their daddy did it without them. |
I have decided that these last few weeks have been about teaching me to enjoy the little everyday blessings in life.
 |
| Finishing an old project. |
 |
| Snack lunch! Who doesn't love it? |
There was a natural gas shortage and we were asked to turn our heat down to 60.
 |
| This man always has lots to do on the computer and neither of the girls is very good at letting him get it done. |
 |
| I sat down to do some cutting. Pattern cutting and a few other projects. I am weird, but I like to cut things out. It came in really handy as a preschool teacher. |
 |
| Peachy dug out all of the toy cell phones and was making sure that we all had one. She had really good customer service, too. |
Thursday, January 23, 2014
Baby Countdown
Time is such a funny thing. At the beginning of this pregnancy, a month seemed to take forever. Here we are with only a month to go and time seems to be flying! I knew the end would be fairly quick, due to the focus being on Thanksgiving and Christmas. Now I see that to be true. People ask if I am ready for the baby and I really have to laugh. I am so much more laid back this time around. With Peachy we got the entire nursery ready.
(You can read about it here and here.) While we were awaiting Cream's arrival, we changed it to a nursery/big girl room. (You can read about that here.)
And for the third, you ask? So far the extent of our planning is hauling the baby items to the front of our storage area and purchasing a bunk bed for the girls' room. At this point, Shortcake will be living in our closet indefinitely. (We always start out with the newborns in our closet. The other two bedrooms are on a different floor and we have found that keeping the new baby close by helps us to spend more time sleeping and less time tripping down the stairs. You can read about Peachy's stay in our closet here.)
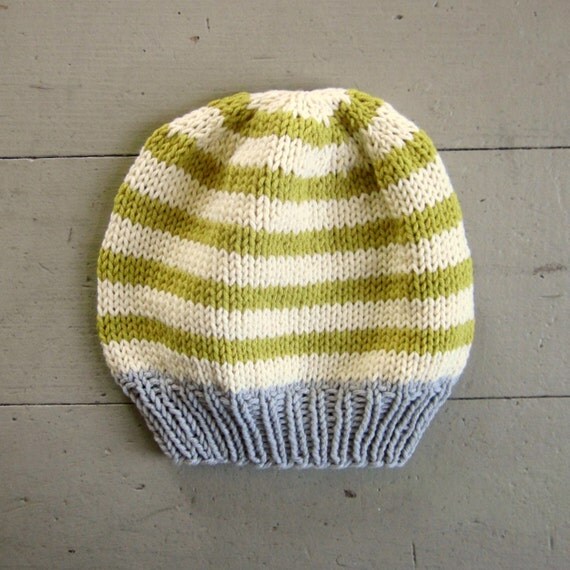
I have also purchased a few items for bringing baby home. This sweet, sweet hat from sweetbabydolly on Etsy.
This darling knit jumpsuit from Target:
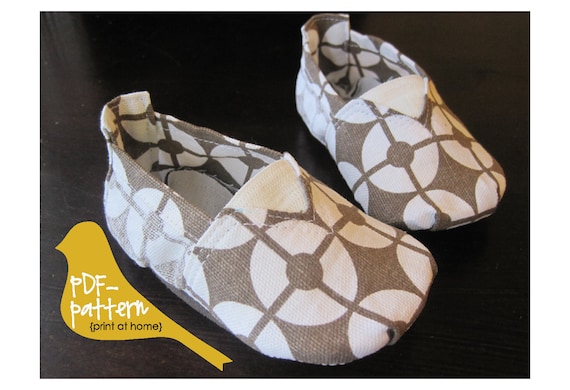
And I am hoping to make these shoes from a pattern I purchased from twirlybirdpatterns on Etsy.
I think that we have also found a boy name and a girl name that we agree on. So, good to know that this child won't be coming home naked or nameless.
Wednesday, January 22, 2014
Peachy's Project
If you follow me on Instagram, you already saw this picture of Peachy working on her sewing project. (If you don't, why not? Check out all of the links to follow me on the ride side---> I would love to connect with you!)
Peachy received this sewing project as a Christmas gift. It is geared toward children a bit older, but I knew that she could handle it. I did have to help her out with tying knots and getting started, but otherwise she did it herself.
She started out working on it all the time and then slowly tapered off. This made me laugh as this is exactly how I used to be when I was a child. It was a bit of a running joke that Kristi never finished a project. So, last week I told her we were going to finish it. And she did. It was very interesting to me to see what sewing skills she has already picked up just from watching me. I always say that is just how I learned to sew as well, by watching my mom.
In case you were wondering, here is a link to the project kit. I liked that it had everything we needed. The instructions were great and had pictures for Peachy to follow. I would recommend this as a great starter hand sewing project for girl who is interested.
Tuesday, January 21, 2014
I'm Just Mad About Citron
Around this time of year, many bloggers introduce their word of the year. While I don't think this is a bad idea, I just know that it isn't for me. This year I decided that I should just pick a color of the year. I love colors. I love how colors can take an ordinary object and make it feel 100% different. I love how colors can make me feel 100% different. So without further ado, I submit to you my 2014 Color of the Year:
Do you know what it is?
Doesn't the name just make you think of happy spring days sitting in the grass drinking lemonade? (Okay, that may be going a bit far, but I happen to like the name citron.
The funny thing is that I thought this color was a recent obsession for me, and then I looked up as I typed this and realized that two large walls in our house happen to be this color.
(I went back to some of my first blog posts for this picture. It was fun to look through them and see the house so neat and tidy and new! It is amazing how a house fills up over 4+ years and 2+ children!)
Do you know what it is?
Doesn't the name just make you think of happy spring days sitting in the grass drinking lemonade? (Okay, that may be going a bit far, but I happen to like the name citron.
The funny thing is that I thought this color was a recent obsession for me, and then I looked up as I typed this and realized that two large walls in our house happen to be this color.
 |
| Brush Meadow by Valspar |
I have also curated a Citron treasury on Etsy. Be sure to go and check out all of these great handmade items HERE.
So, what about you, what's your color of the year?
Monday, January 20, 2014
New Crayon Rolls Listed
I have some new crayon rolls listed in the SHOP.
Be sure to stop in and check them out!
And snatch up one or two!
Be sure to stop in and check them out!
And snatch up one or two!
Friday, January 17, 2014
Foodie Friday: Cinnamon Roll Pretzels
I started with this awesome quick pretzel recipe from Imperial Sugar. Once you get your pretzels shaped, you will want to continue here:
Cinnamon Roll Pretzels:
Topping:
-2 T cinnamon
-6 T brown sugar
-8 T melted butter, divided
1. Brush tops of pretzels with 4 T melted butter.
2. Mix cinnamon and sugar together and dip each pretzel into the mixture. (I sprinkled it on top, but got some on the pan and it was a bit messy. If you have difficulty with dipping, feel free to sprinkle.)
3. Finish the pretzels off by drizzling the remaining 4 T butter on top of the cinnamon sugar topping.
4. Bake pretzels at 450 for 6 minutes. Change heat to broil and continue baking an additional 2-4 minutes. Keep a close eye as sugar topping can burn easily and quickly.
5. Remove pretzels from oven and allow to cool on a baking rack.
Frosting:
-1 ounce cream cheese
-1/8 c softened butter
-3/4 c powdered sugar
-1/2 T milk
-1/4 t vanilla
1. Mix all ingredients in a bowl.
2. Once pretzels have cooled a bit, drizzle with frosting mixture.
Thursday, January 16, 2014
January Etsy Love
As a small business owner, I know how every little sale can make a difference. Because of this, I would like to take some time each month to share some Etsy businesses with you. In my opinion, nothing mass-produced can really compare to something that has been handmade. I am a strong believer in handmade and small business!
All of this month's featured shops are shops that laced orders from at Christmas. Each of their products were delivered to my complete expectations and the customer service of each was also great. Another great thing about all of this month's shops, is that they have items that would all make excellent Valentine's Day gifts.
1) ripeshop: I ordered several of the lip balms from Adriana as parts of Christmas gifts. I loved all of the unique "flavors" to choose from. I had fun picking out special flavors for special people. (I even ordered the chocolate covered bacon.) While I didn't order one for myself, I have heard from many recipients that they love their lip balms.
2) isewcute: My 8 year old neice was the recipient of one of June's handmade resin necklaces. She loved it and so did I. June was even kind enough to include a hand drawn card to go along with the gift. I went with a personalized initial necklace, but wouldn't that cupcake one make a great gift for a little valentine?
3) seventhtree soaps: (This shop is currently on vacation until January 20. Also note, this shop is based out of Australia, so allow extra shipping time.) These fun soaps come in great shapes and scents. I had fun picking out a sampler set and I also snagged one of those owls. And while it wasn't why I chose the product, they are all natural.
4) Manly Soaps: For that hard to buy for man, why not get soap made out of beer? Genius! I had fun giving these to lots of the men in our family. I was sorry to see that they currently don't have much in stock. At Christmas they had several different beer varieties!
Wednesday, January 15, 2014
Winter Pick-Me-Up
Last weekend we had a small reprieve from winter and it felt wonderful! The hubby and I were discussing how nice it was to go out without the need for gloves and hats. That's what 40 degrees will do for those of us from up north.
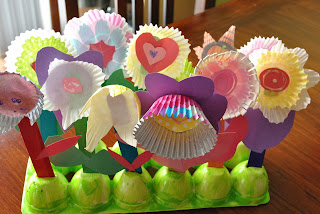
This week we are back to cooler temperatures and blizzard warnings. And since it will be a bit before spring hits these parts, Peachy and I sat down to create a little bright spot for our wintery days.
It all started with an empty egg carton on the counter. I gathered up some popsicle sticks, muffin liners, construction paper, and glitter glue. We painted the egg carton with some acrylic paint, cut our leaves from paper, and had fun creating 12 different, but equally cheery flowers.
Its nice to have a bright spot in our day.
Tuesday, January 14, 2014
Little (Felt) Blue Trucks
A friend of mine recently threw a Little Blue Truck party for her son who was turning two. If you haven't heard of Little Blue Truck, you should check it out. It is a great kids' story. (Just be warned, if you share it with your children, you may end up reading it over and over and over again!) In her party planning she came across this pin for a felt Little Blue Truck.
Unfortunately the pin only leads to an image, but she also found a great felt truck tutorial on Make It & Love It. I set to work with an image of the Little Blue Truck and the tutorial and got to work. I ended up using graph paper to draw out the side truck pieces and then cut them out of felt. Once I had the basic shape, I added in the details and followed Ashley's rocking tutorial and out came two Little Blue Trucks.
Subscribe to:
Posts
(
Atom
)


